Eric Duchin's Millennium Falcon Gallery and Review
(Best viewed in 800x600 mode)
These images and the accompanying text were provided by Eric Duchin of Texas. Eric is stationed at Sheppard Air Force Base and is, as you can see below, an accomplished modeler. Eric purchased his Falcon Accurizing Kit a short while back and has provided both photographs and a bit of an "inside" view into his modeling techniques. We are presenting this page as a reward for his modeling efforts. The text is essentially just as he wrote in his letter to us, only being paraphrased when it makes it easier to read.
When you are done, send Eric some e-mail and tell him what a good job he's done!
Jack Smith
Falcon Kits
Click on each image for a larger picture.
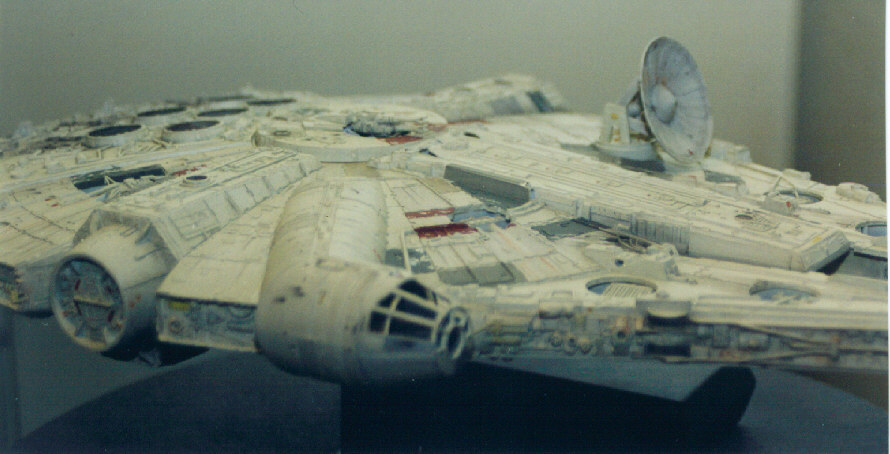
x![]()
1. The "head on": Good shot of the "height" of the ship with the side panels fairly clear. On the two front pieces I drilled out where the "headlights" should be.
![]()
2. Close-up of front pieces: Shows "headlights" again. I drilled through the pieces and inserted a short section of styrene tube.
3. Starboard side, just an overall view of the ship.
![]()
4. Starboard side detail: Your EXCELLENT panel. I added a couple of other small pieces of tube in addition to the ones supplied (which was a great touch! I didn't expect to find the three small sections of rod when I opened the package!)
![]()
5. Cockpit Close-up: The new lower half was an excellent fit! From looking at many, many photos of the ILM studio models, I decided the tube leading to the cockpit was too long, so I trimmed 11/16" from it with a razor saw. Consequently, I had to trim the new lower tube piece to the same length. It gives it more of that "stubby" look. Since I trimmed the piece, that thin band with the corrugated detail was removed, so I re-made it in .020" styrene sheet. Also, if you look closely at the cockpit windows, you can see I built up frames around each one with strip styrene (in addition to the cross-bars). This more closely resembles the appearance of the ILM models.
![]()
6. Starboard "loading port": Another clear shot of the side panels. Good view of how well your lower cockpit tube fits! To the left of the round port you can see some "damage" to the hull metal.

7. Gun Turret: This doesn't show any of your parts, just some of the weathering I did. Also, my "reconstructed" cannon. Although it's not clear, I built the interior gun compartment.
![]()
8. Gun from left side: Another shot of my modified cannon. All detail is made from .010" styrene strips. I modified the gun mount to look more like the five foot ILM model. I scrapped the "T" bracket supplied with the model and built a straight rod running directly to the back of the gun.
![]()
9. Left side: Shows your side panels detailed and complete.

10. "Battle Damage": The big blaster hits. These were really fun to do! Look closely and you can see that around the edge of each hole, the hull plating is lifted away. I carved completely through the plastic and covered the holes from the inside.
![]()
11. Left side, Forward: Your side panel again!

12. Sensor dish: I modified my dish according to ILM's model. I smoothed out the center cone and added a third small probe. I also "notched" the edges of the dish (better seen in photo #11). Also, to the left of the dish you can see where I hollowed out the dark square area. On the stock model kit, this is just a flat surface, but on the studio model it's open.
From Eric (to Jack)
Hope you enjoy the photos. I had a lot of fun building and detailing the Falcon - thanks in large part to your product! I hope somehow to be able to get some good shots of the cockpit, the camera we have just can't focus close enough. I also lit the model with AMT's Fiber Optic Lighting Kit. Five (5) large bulbs to light the engines, and fiber optic strands to light the cockpit and gun compartment. The back wall alone has 56 individual lights! I'll try to figure out a way to photograph those as well.
A VERY satisfied customer,
Eric Duchin
email : mailto:ultraman84@aol.com